
Introduction
WebSockets are amazing when you want to add real-time features like chat, notifications, or live data updates to your web application. If you're working with Next.js App Router, you might wonder how to use WebSockets with it.
That’s where Socket.IO comes in! It’s a library that makes working with WebSockets super easy.
In this guide, we’ll cover two ways to use WebSockets with Next.js:
- Nextjs with custom server : This is a simple option, but it’s not ideal for big projects
- Separate WebSocket Server: A more scalable and flexible setup.(Recommended)
By the end of this, you’ll know how to implement both methods and when to use each one. Ready? Let’s get started!
Method 1: Using a Custom Server in Next.js
Dependencies
pnpm add socket.io socket.io-client tsxsocket.iofor WebSocket functionalitytsxto run the development server:tsx server.ts
Setting Up the Custom Server with Socket.IO
Create a file named server.ts in the root of your project
import { createServer } from 'http'
import { parse } from 'url'
import next from 'next'
import { Server } from "socket.io";
import socketHandler from './server/sockets';
const port = parseInt(process.env.PORT || '3000', 10)
const dev = process.env.NODE_ENV !== 'production'
const app = next({ dev })
const handle = app.getRequestHandler()
app.prepare().then(() => {
const httpServer = createServer((req, res) => {
const parsedUrl = parse(req.url!, true)
handle(req, res, parsedUrl)
})
/**
* Socket.io server
*/
const io = new Server(httpServer, {
cors: {
origin: "*",
methods: ["GET", "POST"]
}
});
io.on('connection', (socket) => {
socketHandler(socket, io);
});
httpServer.listen(port, () => {
console.log(
`> Server listening at http://localhost:${port} as ${dev ? 'development' : process.env.NODE_ENV
}`
);
});
})We will handle the sockets logic in a separate file: server/sockets/index.ts
import { Server, Socket } from 'socket.io';
const socketHandler = (socket: Socket, io: Server): void => {
console.log('A user connected:', socket.id);
socket.on('sendMessage', (message: string) => {
socket.broadcast.emit('sendMessage', message)
});
socket.on('disconnect', () => {
console.log('A user disconnected:', socket.id);
});
};
export default socketHandler;Adding a TypeScript Configuration for the Server
Create a tsconfig.server.json file in the root of your project :
{
"extends": "./tsconfig.json",
"compilerOptions": {
"module": "CommonJS",
"outDir": "dist",
"lib": ["ES2019"],
"target": "ES2019",
"isolatedModules": false,
"noEmit": false
},
"include": ["server.ts"]
}Update your existing tsconfig.json file as follows
- "moduleResolution": "bundler",
+ "moduleResolution": "node",Updating package.json Scripts:
Add the following scripts to your package.json:
"dev": "tsx server.ts",
"build": "next build && tsc --project tsconfig.server.json",
"start": "NODE_ENV=production node dist/server.js",Reference
For more details on using a custom server in Next.js, refer to the Next.js Custom Server Documentation.
Method 2: Using a Separate WebSocket Server (Recommended)
Why Use a Separate Server?
Keeping a separate server for WebSockets is a smart choice because:
- No Need for a Custom Next.js Server: This means your setup stays future-proof, and you avoid messing with Next.js optimized framework features.
- Handles More Users: You can scale the WebSocket server without affecting your Next.js app.
- Organized Code: Your Next.js app focuses on pages, and the server handles real-time updates.
Even Lee Robinson, a core member of the Vercel team, doesn’t recommend using a custom server with Next.js. So, using a separate WebSocket server is a cleaner, future-proof way to go!
Building the WebSocket Server
Create a Separate Directory : Make a new folder called websocket and run:
npm init -yInstall Dependencies
pnpm add socket.io nodemonCreate app.js
import { Server } from "socket.io";
import socketHandler from './sockets/index.js';
const PORT = 3005;
const io = new Server({
cors: {
origin: "*",
methods: ["GET", "POST"]
}
});
io.on('connection', (socket) => {
socketHandler(socket, io);
});
io.listen(PORT, () => {
console.log(`Server is running on port ${PORT}`);
})This code initializes a WebSocket server on port 3005 and uses the same sockets/index.js file to handle socket-related events.
Update package.json:
Add the following changes:
{
"name": "express",
"version": "1.0.0",
"main": "index.js",
+ "type": "module",
"scripts": {
+ "start": "node app.js",
+ "dev": "nodemon app.js"
},
"keywords": [],
"author": "",
"license": "ISC",
"description": "",
"dependencies": {
"nodemon": "^3.1.9",
"socket.io": "^4.8.1"
}
}Reference doc https://socket.io/docs/v4/server-initialization/
Connecting Your Frontend
To integrate WebSocket functionality into your Next.js frontend, we’ll create a reusable SocketProvider component. This component establishes a single WebSocket connection when the app loads, making it available across the application.
Creating SocketProvider.tsx
'use client';
import React, { createContext, useContext, useEffect, useState } from 'react';
import { io, Socket } from 'socket.io-client';
interface SocketContextType {
socket: Socket | null;
}
const SocketContext = createContext<SocketContextType | undefined>(undefined);
export const SocketProvider: React.FC<{ children: React.ReactNode }> = ({ children }) => {
const [socket, setSocket] = useState<Socket | null>(null);
useEffect(() => {
// const socketInstance = io("http://localhost:3005"); for different server websocket url
const socketInstance = io();
setSocket(socketInstance);
return () => {
socketInstance.disconnect();
};
}, []);
return (
<SocketContext.Provider value={{ socket }}>
{children}
</SocketContext.Provider>
);
};
export const useSocket = (): Socket|null => {
const context = useContext(SocketContext);
if (!context) {
throw new Error('useSocket must be used within a SocketProvider');
}
return context.socket;
};Usage
Wrap your application with the SocketProvider in layout.tsx to ensure the WebSocket connection is available throughout the app.
export default function RootLayout({
children,
}: Readonly<{
children: React.ReactNode;
}>) {
return (
<html lang="en">
<body className={inter.className}>
<SocketProvider>
{children}
</SocketProvider>
</body>
</html>
);
}- Using the WebSocket in a Component
const socket = useSocket();
useEffect(() => {
if (!socket) return;
socket.on("sendMessage", (message: string) => {
setMessages((prevMessages) => [...prevMessages, {
sender: 'other',
message
}]);
});
return () => {
socket.off("sendMessage");
};
}, [socket]);Testing
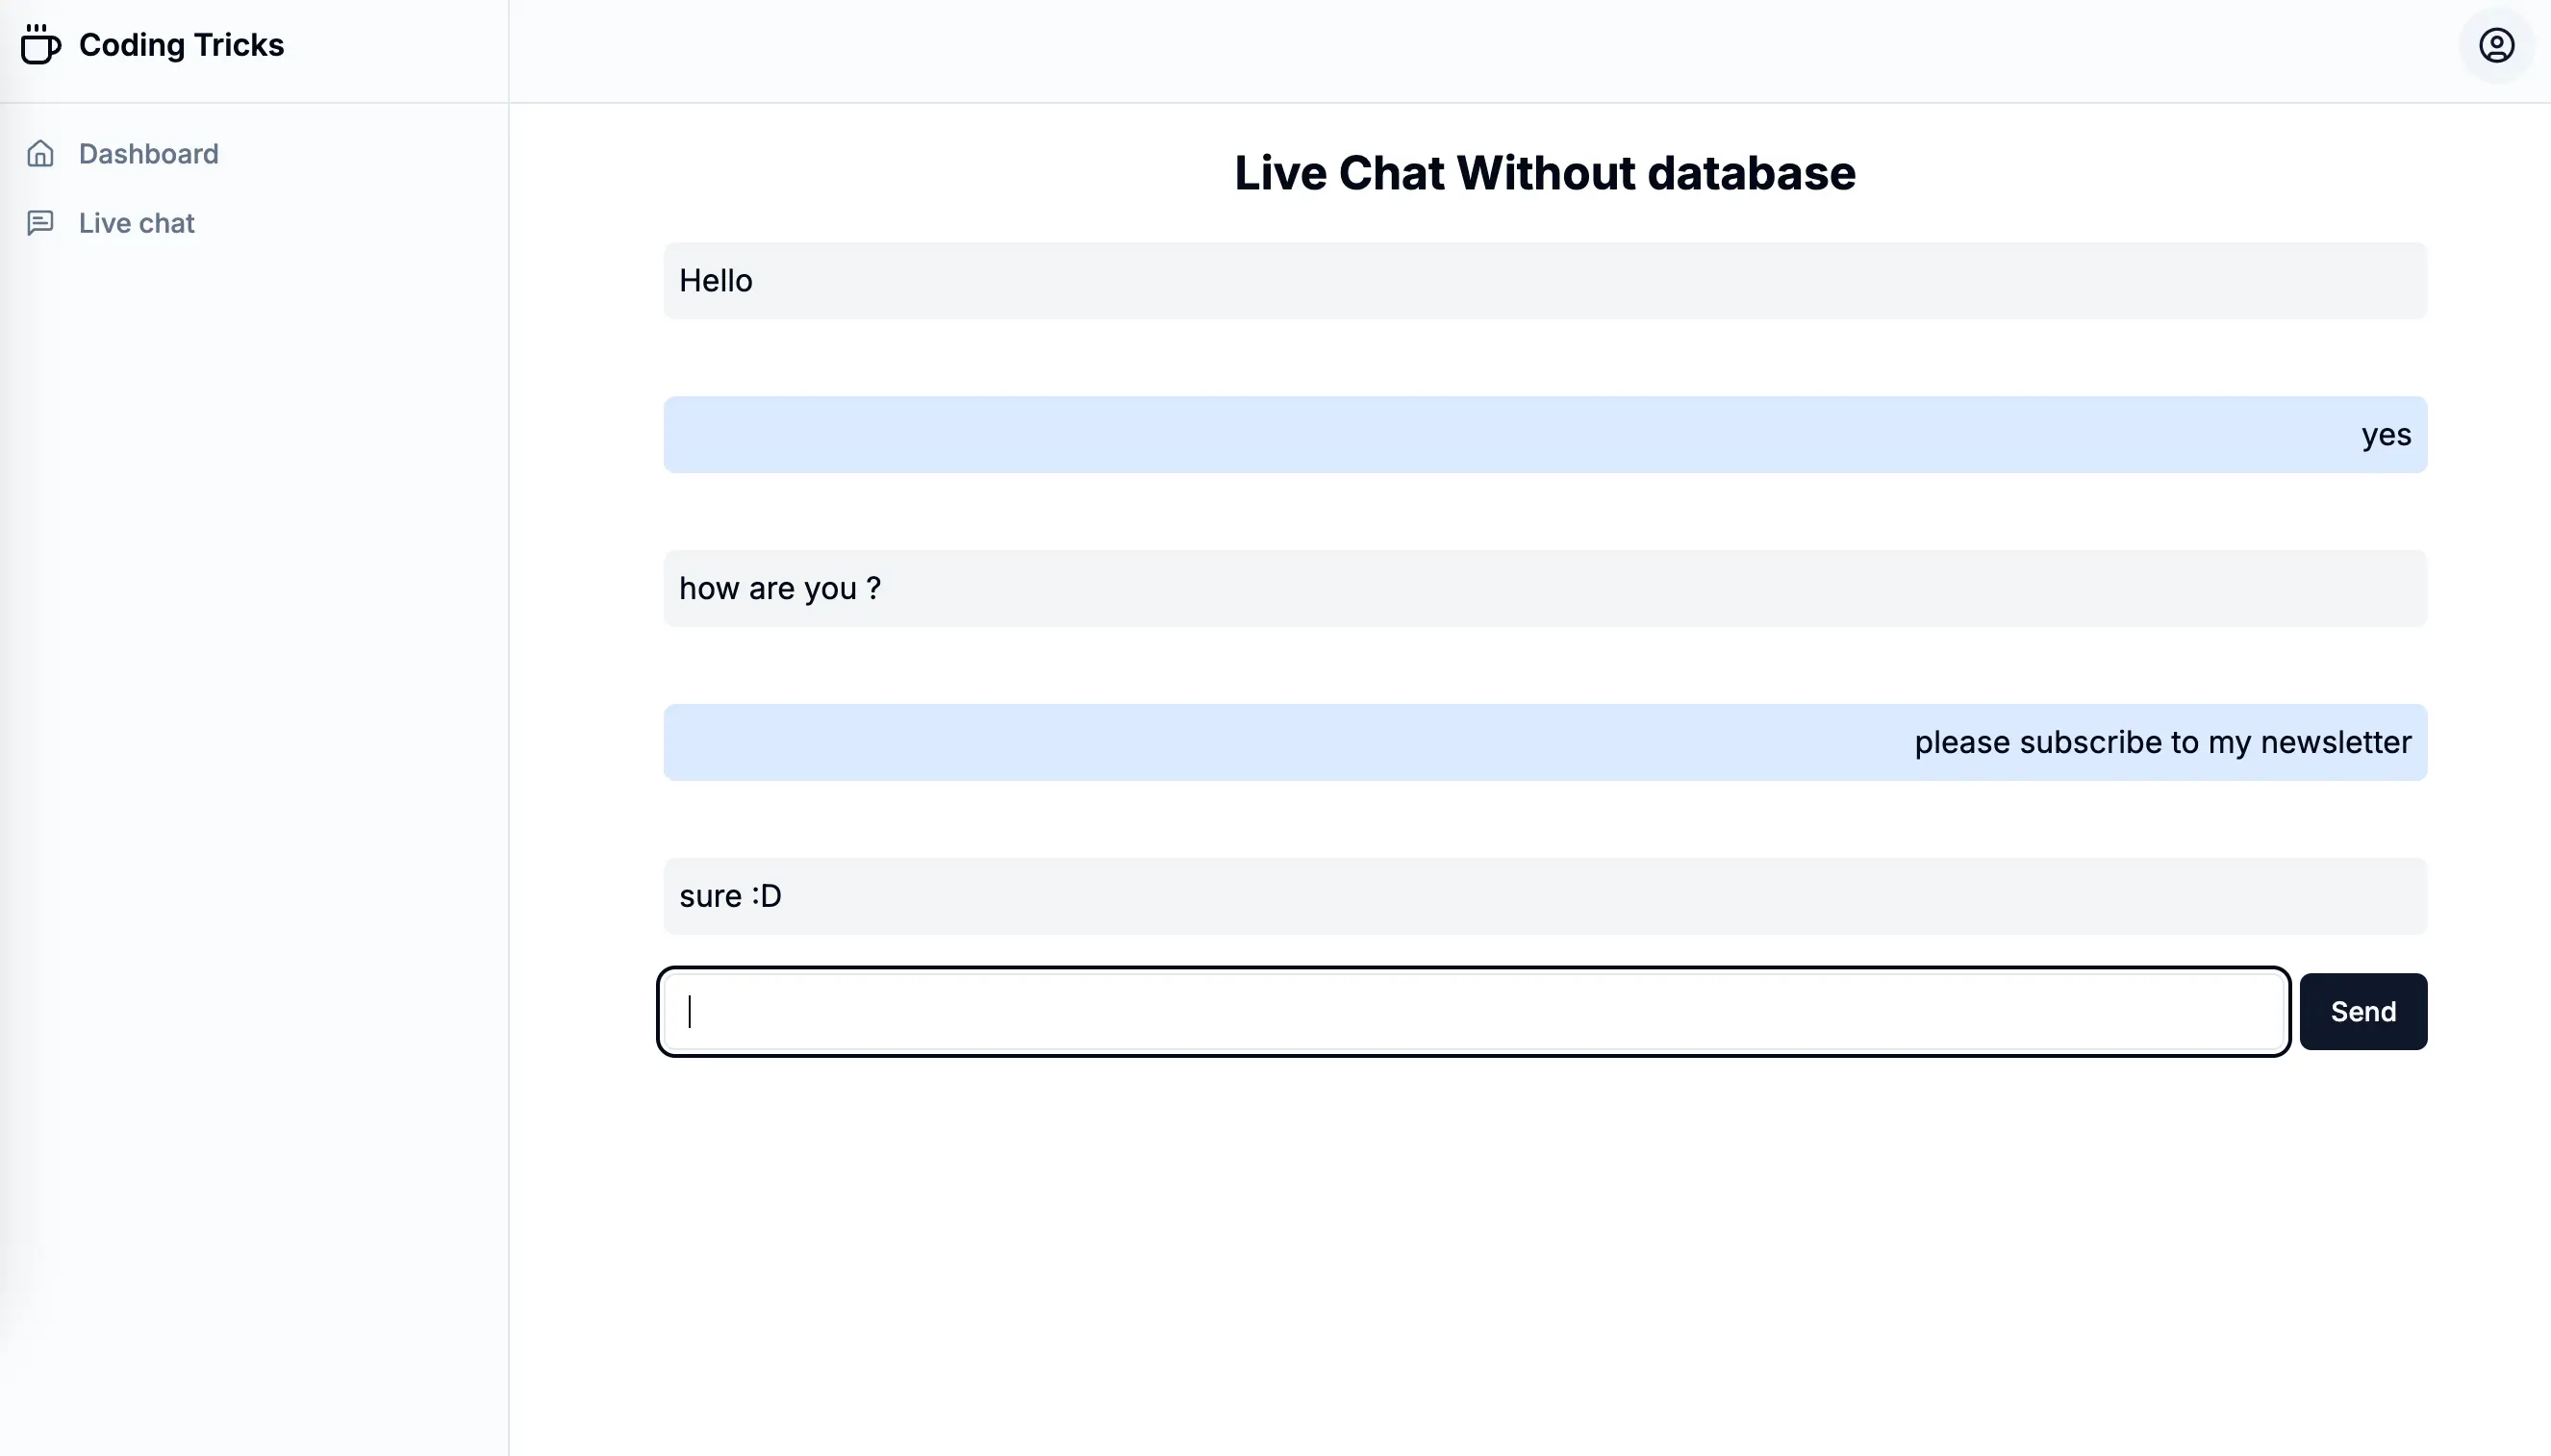
We’ll add a new live-chat page to the Next.js Role and Permission repo to demonstrate WebSocket functionality.
Here’s the complete code for the live-chat page
"use client";
import { useSocket } from '@/components/SocketProvider';
import { Button } from '@/components/ui/button';
import { Input } from '@/components/ui/input';
import React, { FormEvent, useEffect, useState } from 'react';
interface Message {
sender: 'me' | 'other';
message: string;
}
export default function LiveChat() {
const [messages, setMessages] = useState<Message[]>([]);
const socket = useSocket();
useEffect(() => {
if (!socket) return;
console.log("Socket connected");
socket.on("sendMessage", (message: string) => {
setMessages((prevMessages) => [...prevMessages, {
sender: 'other',
message
}]);
});
return () => {
socket.off("sendMessage");
};
}, [socket]);
const sendMessage = (e: FormEvent<HTMLFormElement>) => {
if (!socket) {
alert('Socket not connected');
return;
}
e.preventDefault();
const form = e.currentTarget
const formData = new FormData(form);
const message = formData.get('message') as string
socket.emit('sendMessage', message);
setMessages([...messages, {
sender: 'me',
message
}]);
form.reset();
}
return (
<>
<div className="px-20 py-5">
<h1 className="mb-5 font-bold text-2xl text-center">Live Chat Without database</h1>
<div className="space-y-10 mb-5">
{messages.map((message, index) => (
<div key={index} className={`p-2 rounded-md ${message.sender === 'me' ? 'bg-blue-100 text-right' : 'bg-gray-100 text-left'}`}>
{message.message}
</div>
))}
</div>
<form onSubmit={sendMessage} className="flex space-x-2">
<Input type="text" name='message' />
<Button>Send</Button>
</form>
</div>
</>
);
}In this example, there are two things happening:
- Listening for Messages: Inside the
useEffect()hook, the client listens for anysendMessageevent. When a message is received, it updates themessagesstate with the new message:
socket.on("sendMessage", (message: string) => {
setMessages((prevMessages) => [...prevMessages, { sender: 'other', message }]);
});
- Emitting Messages: In the
sendMessage()method, the client emits asendMessageevent containing the message content. The server handles this by broadcasting the message to all other connected clients:
socket.emit('sendMessage', message);The server-side logic looks like this:
socket.on('sendMessage', (message) => {
socket.broadcast.emit('sendMessage', message)
});This setup creates a real-time chat functionality where messages are dynamically sent and received without needing a database.
All the code mentioned in this example is available on the https://github.com/Kamleshpaul/nextjs-role-and-permission
Wrapping Up
In this guide, we explored two ways to integrate WebSockets into your Next.js project:
- Custom Server Approach - Ideal for smaller applications but limited in scalability and compatibility with Next.js optimizations.
- Separate WebSocket Server - A scalable, flexible, and recommended approach for production-ready applications.
We also demonstrated how to integrate WebSocket functionality into your frontend using a reusable SocketProvider and tested the implementation with a live chat feature.
Both methods have their place depending on your project’s requirements. For long-term scalability and maintainability, the separate WebSocket server is generally the better choice.
FAQs
Why use a separate WebSocket server instead of integrating it with Next.js?
A separate WebSocket server allows better scalability and keeps your Next.js app optimized for serverless deployment. It also aligns with Next.js best practices by avoiding the use of custom servers.
Can I use this WebSocket setup with a hosted Next.js app on Vercel?
No, Vercel does not support WebSocket connections in its serverless environment. You'll need to host your WebSocket server on a different platform, such as AWS, DigitalOcean, or a dedicated Node.js server.
Reference: Vercel's WebSocket limitations.
What happens if the WebSocket server is down?
If the WebSocket server is unreachable, the frontend won't be able to establish or maintain the real-time connection. You can handle such cases gracefully by notifying users or falling back to other communication methods.
Can I use libraries other than socket.io for WebSockets?
Absolutely! Libraries like ws or native WebSocket APIs can also be used. However, socket.io simplifies setup and offers robust features like event handling and broadcasting.
Where should I deploy the WebSocket server?
You can deploy it on any platform supporting Node.js, such as AWS, DigitalOcean, or even your local server, depending on your scaling needs.