
Implementing Roles and Permissions in your Next js 14: An Overview
Managing Roles and permissions in your Next js 14 application is crucial for controlling access to various parts of your app. This article provides a
Managing Roles and permissions in your Next js 14 application is crucial for controlling access to various parts of your app. This article provides a high-level overview, allowing you to implement these concepts regardless of the authentication method or database you are using. For a detailed, step-by-step guide, stay tuned for our in-depth article.
We’ll cover how to implement Role-Based Access Control (RBAC) in your Next js 14 application. The focus will be on:
- Protecting Pages and Components: Learn how to restrict access to specific pages or components based on user roles and permissions.
- Using a Guard Component: Implement a component that conditionally renders content based on the user’s permissions.
- Helper Functions for Permission Management: Utilize functions to fetch user permissions and check for specific access rights.
- What Needs to be Protected:
- Pages: Restrict access to certain routes based on the user’s role and permissions.
- Components: Show or hide components depending on whether the user has the required permissions.
Database Structure
To get started, you’ll need to set up your database with the following tables:
- users
- roles
- permissions
- role_permissions
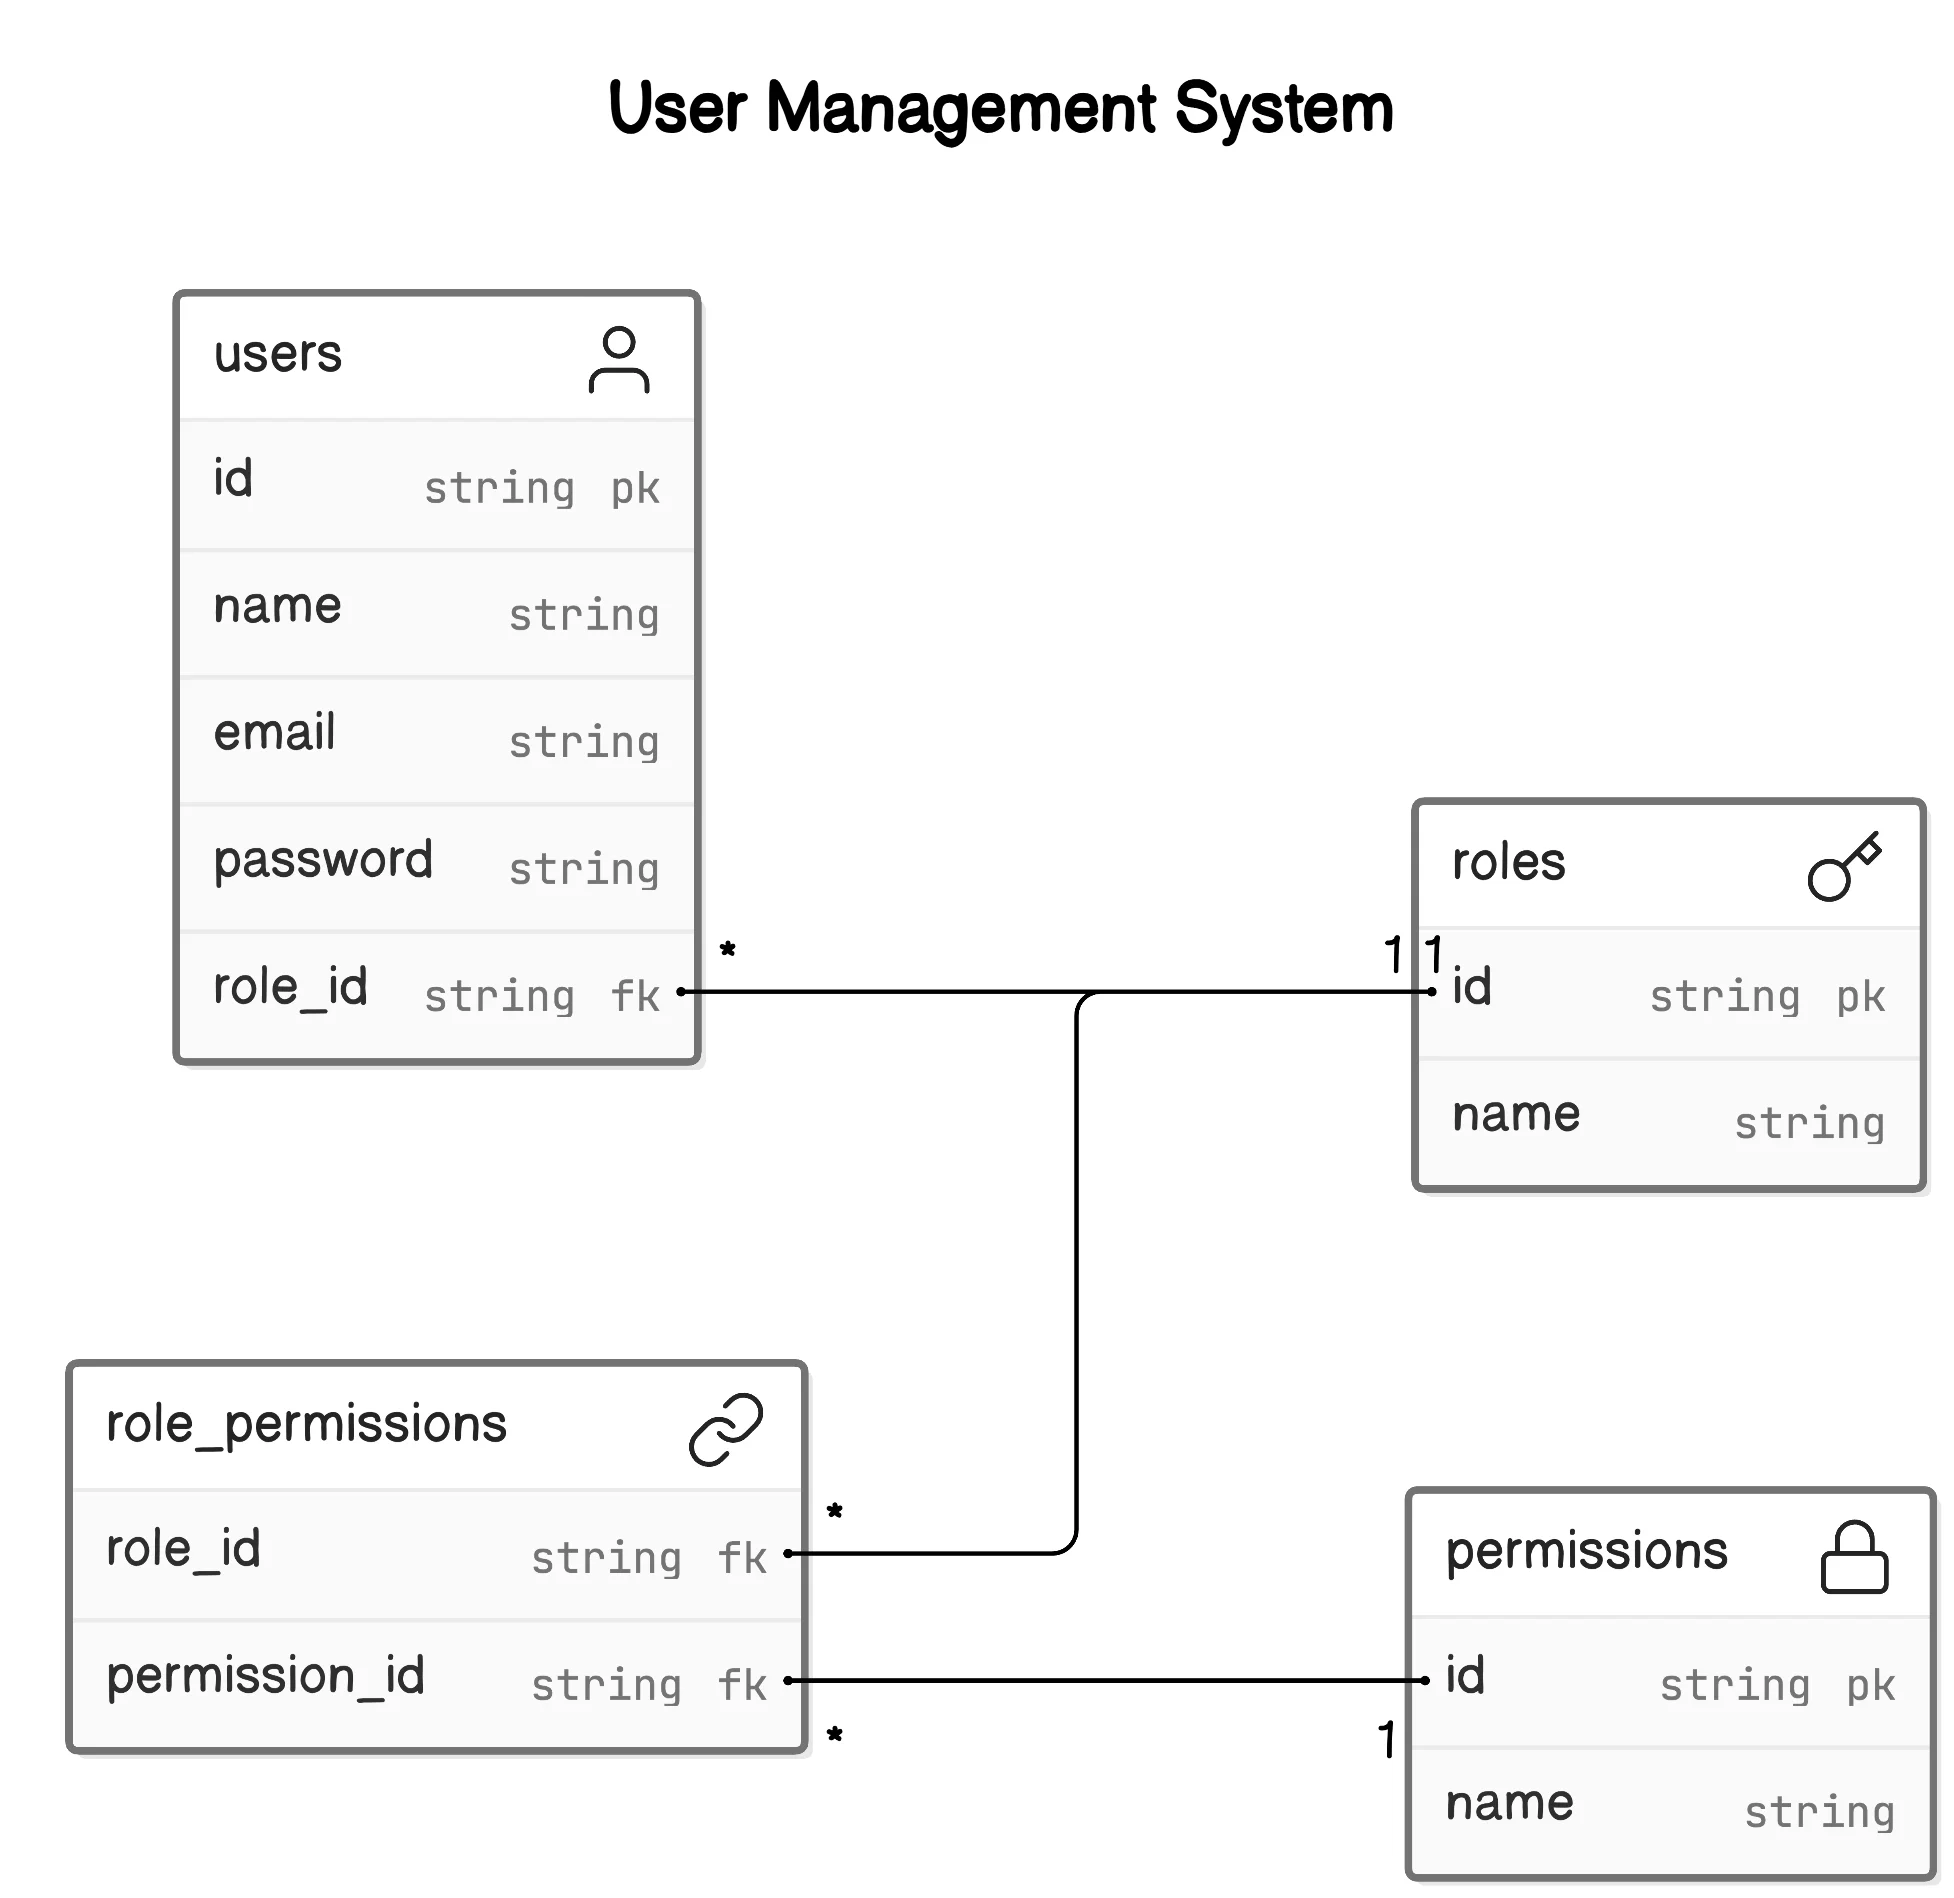
You can use any database to store this data. Here’s the basic idea:
- Users table: Each user can have one role.
- Roles table: Roles can have many permissions.
- Role_Permissions table: This pivot table links roles to permissions.
Here’s a basic example of inserting roles and permissions:
const roles = await db.insert(Schema.rolesTable).values([
{ name: 'admin' },
{ name: 'editor' },
{ name: 'user' },
]).returning();
const permissions = await db.insert(Schema.permissionsTable).values([
{ name: 'post-list' },
{ name: 'post-create' },
{ name: 'post-edit' },
{ name: 'post-delete' }
]).returning();
const getRoleId = (roleName) => {
const role = roles.find(role => role.name === roleName);
if (!role) {
throw new Error(`Role ${roleName} not found`);
}
return role.id;
};
const getPermissionId = (permissionName) => {
const permission = permissions.find(permission => permission.name === permissionName);
if (!permission) {
throw new Error(`Permission ${permissionName} not found`);
}
return permission.id;
};
const rolePermissions = [
{ role_id: getRoleId('admin'), permission_id: getPermissionId('post-list') },
{ role_id: getRoleId('admin'), permission_id: getPermissionId('post-create') },
{ role_id: getRoleId('admin'), permission_id: getPermissionId('post-edit') },
{ role_id: getRoleId('admin'), permission_id: getPermissionId('post-delete') },
{ role_id: getRoleId('editor'), permission_id: getPermissionId('post-create') },
{ role_id: getRoleId('editor'), permission_id: getPermissionId('post-edit') },
{ role_id: getRoleId('user'), permission_id: getPermissionId('post-list') }
];
await db.insert(Schema.rolePermissionsTable).values(rolePermissions);
await db.insert(Schema.usersTable).values([
{ name: 'Admin', email: 'admin@example.com', password: await makePassword('password'), role_id: getRoleId('admin') },
{ name: 'Editor', email: 'editor@example.com', password: await makePassword('password'), role_id: getRoleId('editor') },
{ name: 'User', email: 'user@example.com', password: await makePassword('password'), role_id: getRoleId('user') }
]);Implementing Role-Based Access Control
- Define a list of permissions in a constant file:
export const permissionList = {
POST_SHOW: 'post-list',
POST_CREATE: 'post-create',
POST_EDIT: 'post-edit',
POST_DELETE: 'post-delete'
// add more as per need, it should match with permissions table names
};Guard Component
- create a Guard component to hide and show child components based on the logged-in user’s permissions:
"use server";
import { getMyPermissions } from "@/server/queries/user";
import { ReactNode } from "react";
interface GuardProps {
permissions: string[];
children: ReactNode;
}
export default async function Guard({ permissions, children }: GuardProps) {
const myPermissions = await getMyPermissions();
const hasPermissions = permissions.every(permission =>
myPermissions.some(x => x.permissionName === permission)
);
if (!hasPermissions) {
return null;
}
return (
<>
{children}
</>
);
}- This is a server component, so it won’t show any UI shift on the frontend and it is more secure as it is server side.
Usage
<Guard
permissions={[permissionList.POST_DELETE]}
>
<Button>
Delete Post
</Button>
</Guard>Like this you can hide.
- Now you need to protect route as well right let cover this as well.
Helper Functions
To fetch permissions for the logged-in user:
"use server";
export const getMyPermissions =async () => {
const session = await auth(); // next-auth
if (!session?.user?.role_id) {
throw new Error("Role id not found in session.");
}
const permissions = await db
.select({
permissionName: permissionsTable.name
})
.from(rolePermissionsTable)
.innerJoin(permissionsTable, eq(rolePermissionsTable.permission_id, permissionsTable.id))
.where(eq(rolePermissionsTable.role_id, session.user.role_id));
return permissions;
};- To check if the user has a specific permission:
"use server"
import { getMyPermissions } from "@/server/queries/user";
import { cache } from "react";
export const hasPermission = cache(async (permissions) => {
const myPermissions = await getMyPermissions();
return permissions.every(permission =>
myPermissions.some(x => x.permissionName === permission)
);
});Protect Pages and redirect
import { permissionList } from '@/utils/constants';
import { hasPermission } from '@/utils/guard';
import { redirect } from 'next/navigation';
import React from 'react';
export default async function UserPage() {
const permission = await hasPermission([permissionList.POST_SHOW]);
if (!permission) {
return redirect('/');
}
return (
<div>You have User page access</div>
);
}Conclusion
This is a high-level overview of how you can set up roles and permissions in a Next js application. You can use this setup no matter what authentication method or database you are using. For a detailed, step-by-step guide, Click here
By following these basic steps, you can ensure that your Next js application has a robust role and permission management system.
Github url https://github.com/Kamleshpaul/nextjs-role-and-permission